instructional article

Backpacking Meal Ideas

Backpacking season is here!! I love backpacking. It was one of my earliest outdoor passions. The unknown of the trail, the fulfillment of looking down from the summit, the feeling of self-sufficiency that comes from carrying everything you need on your back. In backpacking it's all about taking less. But somethings you have to take. Food is one of those. If you're like me, you get tired of the same options over and over on the trail. I wanted to post a few of my favorite options. One of the best sources I have found is this article. It gives some great options for breakfast, lunch and dinner. 

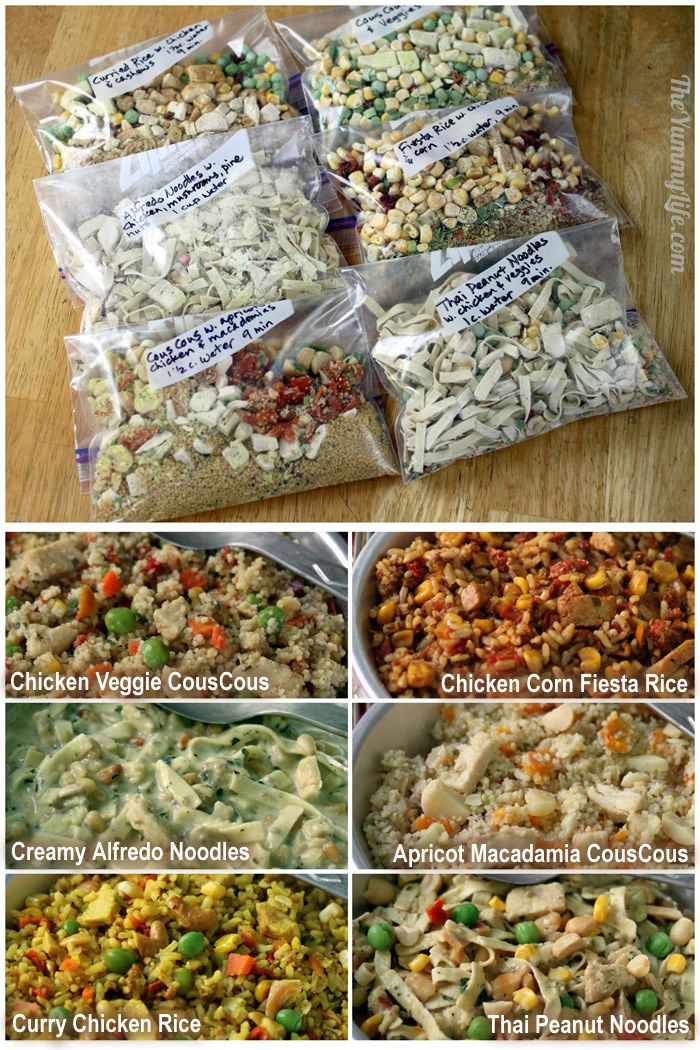
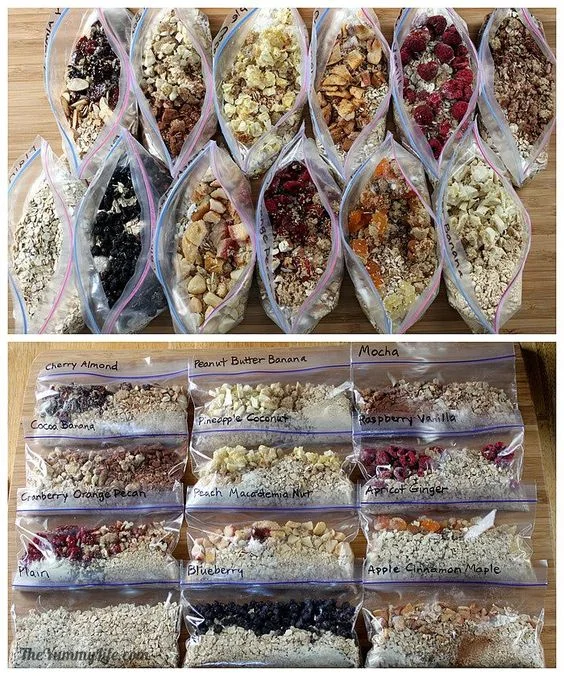
I always want something substantial and tasty at dinner time. After a long day on the trail you've earned it. Here are a few DIY meals that are lightweight, tasty and fulfilling.

I have frequently made my own meals based on a bag (or two...) of ramen noodles, choppped beef jerky, freeze dried veggies and then a variety of seasonings. Ginger powder is a nice switch up. I'm pretty loose about the recipes I use, which only adds to the variety :) I'd suggest trying a couple things before hand and seeing what you like the most. 

colter-co-backpacking-meal-ideas

Snack time! What about the times you need a little pick me up with out wanting to boil water? I have a few favorites. Dried hummus mix (in the bulk section at Winco) is a great, easy, sustaining way to get some protein and calories. It mixes with water, oil and lemon juice, ideally. Although I have mixed just water in and found it perfectly suitable. It pairs well with a hearty cracker, summer sausage and ice cold filtered creek water. 

colter-co-backpacking-meal-ideas

Another option is single serve tuna. Each pouch gives a nice kick of protein and it's shelf stable. When you've hit the end of your ability to look at trail mix and peanut butter, this is a good place to turn. 

We want to hear your favorite backpacking meals! We are always looking for more. Let us know here, or on Facebook. 

instructional video

Learn how to Tie Knots

We are starting a series of video tutorials here at Colter co. Starting with our favorite subject: Knots! We're starting out with a fishing knot and a couple classic climbing knots. Our Know Your Knots bandana and Fly Fishing Knots bandana are great for reminders and reference, but it's super helpful to learn how to tie the knots ahead of time.

The Clinch knot is a classic tippet to fly knot. It's a simple knot and pretty straight forward. It was the first fishing knot I every learned. I just recently learned this super fast and easy way of tying it with the hemostat. Once you try it, you'll never go back. 

The bowline is used when you want a loop that will not slip. Think rope hanging from a helicopter to lift you to safety. Not a good time for a slip knot 😳. In that case make the loop large enough to sit in like a swing. You can also tie a small loop to use for making snares or lassos. Because the bowline loop won't cinch down it allows the lasso to slip tight more quickly. It's a knot that will hold firm under weight, but will still untie afterwards. There's even a way to tie it with one hand! But that's for a future post.

The alpine butterfly is used to create a fixed loop in the center of a rope when you don't have access to the ends. It's used in rock climbing and rescue. You can use it to make a loop to hang a carabiner from, or to isolate a damaged section of a rope so you don't plummet to your death. There are lots of other, around the camp uses you can use this one for. 

Please let us know what you think! We take requests. :)

Trail review

Tyler & Becca PCT

_DSC3336.jpg

In April we posted about Tyler & Becca plan to hike the Pacific Crest Trail. And they made it! We asked them a few questions about their trip. Talking to them makes me really look forward to hiking this summer. 

CC: What did you learn about your gear? 

T&B: We learned that quality gear is worth the investment. We did our homework and found gear that was going to fit our specific needs, but that would stand up to the abuse that we put it through. If on average a person spends 15 nights a year out backpacking the gear will last a good long while and is worth the investment. We were out 136 nights, which is equivalent to about 9 years of use that we put into our gear in one 4 1/2 month period. We had to do some minor mending and patching along the way, but overall everything is in great shape...except for our shoes. They all took a trip to the trash can.

colter_co_PCT

CC: What gear was worth its weight in gold, and what was not worth having? 

Worth its weight in gold:
Becca: CALORIES!, trekking poles, sleeping quilt, leuko tape (for blisters), Nike Pro Indy bra, bug headnet, baby powder

Tyler: CALORIES!, solar panel, Sony NEX 7 camera with 16-50mm lens, Patagonia Houdini wind jacket, fishing pole

- A little more on calories: All food that you are craving is worth carrying. Avacados, an entire block of cheese, a jumbo bag of Fritos, chocolate cake, no problem!

Not worth having:

Sawyer Mini water filter - go with the full size version, sunscreen (not recommended for everyone else. We tanned up pretty quickly and never used it again), bug spray (as long as you're walking 3 mph the mosquitos can't catch you. In camp we just put on more layers).

colter_co_PCT

CC: How did you alter your gear along the way?

T&B: The alterations were mainly to get rid of redundancies or gear that we thought we'd use but didn't. I ditched extra camera batteries once I had a good system down and we ditched a tarp to use as shade in the desert that we never used. Anything else that we would potentially need, but didn't want to carry was put into a "bounce box". Basically, you address a package to yourself two or three towns ahead and put in stuff that you might need. I had a big bottle of contact solution that I could use to refill my smaller one, extra socks and underwear, ziploc bags, and even some snacks and extra meals.

colter_co_PCT

CC: What was your favorite parts of the experience?

T&B: For Becca it was the trail life with all of the social interactions. For me, it was definitely the scenery and the opportunity to see some incredible parts of the country. We both really enjoyed hiking through the Sierras and any other big mountain pass. It is a hard and discouraging climb, but once you get to the top of the pass and see all of the lakes and beautiful scenery that lies ahead of you all of the hard moments melt away.


CC: What was the hardest part of the experience?

T&B: The hardest part was definitely the repetitive nature of getting up day after day to hike 20+ miles. You go to bed exhausted and wake up in the morning slightly less exhausted. Finding that motivation in the morning would be really difficult for us if we weren't hiking with each other. I don't know how solo hikers do it. We were a good source of motivation for each other and she kept me from hitting the snooze button daily. If you can make it past the first few weeks where your body is adjusting, then the rest is mostly mental. Your body get into such incredible shape that you are a walking machine. 

CC: Did you meet any interesting people on the trail?

T&B: Oh, so many! It takes a certain kind of crazy to spend 4 to 6 months living out of a backpack. All walks of life were represented, but the coolest part was that the trail was a level playing field. It doesn't matter if you work at McDonalds or are a doctor, everyone is able to be their true selves without judgement. There were the crazy hippie types, but they tended to be occupied with alcohol and drugs. We kind of separated ourselves from that crowd just by the pace that we set for ourselves. 

We made a handful of friendships that will last a lifetime. "Ricky Bobby" from Michigan, "Raddish" from Oregon, Tami from Oregon, "Diatom" from California, and "Salamander" and "Tree Beard" from Washington were our closest friends. No topic is off limits when you sit around picking your feet and popping blisters in front of someone. You get to know people pretty quickly.

CC: Did your Colter Co. bandanas come in handy? :)

T&B: Yes! A bandana for a quick wipe of the forehead on a steep climb, or added sun protection is always handy.

CC: Did you guys get hiker nicknames?

T&B: Yes, mine was "Nomad", because I was always exploring and didn't sit still when other people were just relaxing. It was usually because I was off exploring a stream or lake.

Becca's was "Rattles", because she is chatty and as some of our close friends said, "you tend to rattle on and on". 

Trail names have to be given to you by people that you're around, not self-appointed. Most of the time it comes from a personality trait or something quirky that you do. 

colter_co_PCT
colter_co_PCT
colter_co_PCT
colter_co_PCT
colter_co_PCT

instructional article

Presentation is everything...

Now we usually focus on knots around here. But even if you have the best knots around and the perfect fly, if the fish don't see it they aren't going to bite. You've got to get that fly in front of the fish!  A big part of that is reading the water and knowing were the fish are, or are likely to be. This awesome graphic we found is a great guide or reminder of how to get that fly in to the strike zone. Now get out there are fish!