Every good skill deserves a back up plan. Navigation is no exception. GPS was a game changer when it comes to wilderness navigation. But it does have weaknesses. Batteries die, devices gets dropped, and sometimes you just don't getting reception. Having a back up solution to GPS is a must. Map and compass is essential skill, but sometimes you don't have a compass with you. That's where celestial navigation can come into play. The great thing about using the sun, moon and starts to navigate is that you don't have to pack them.
I would never suggest going on a trip underprepared. Please do take your 10 essentials with you on any outdoor outing. But if your gear starts to act up, or you're not feeling confident in the information it's giving you, it's good to have this in your back pocket.
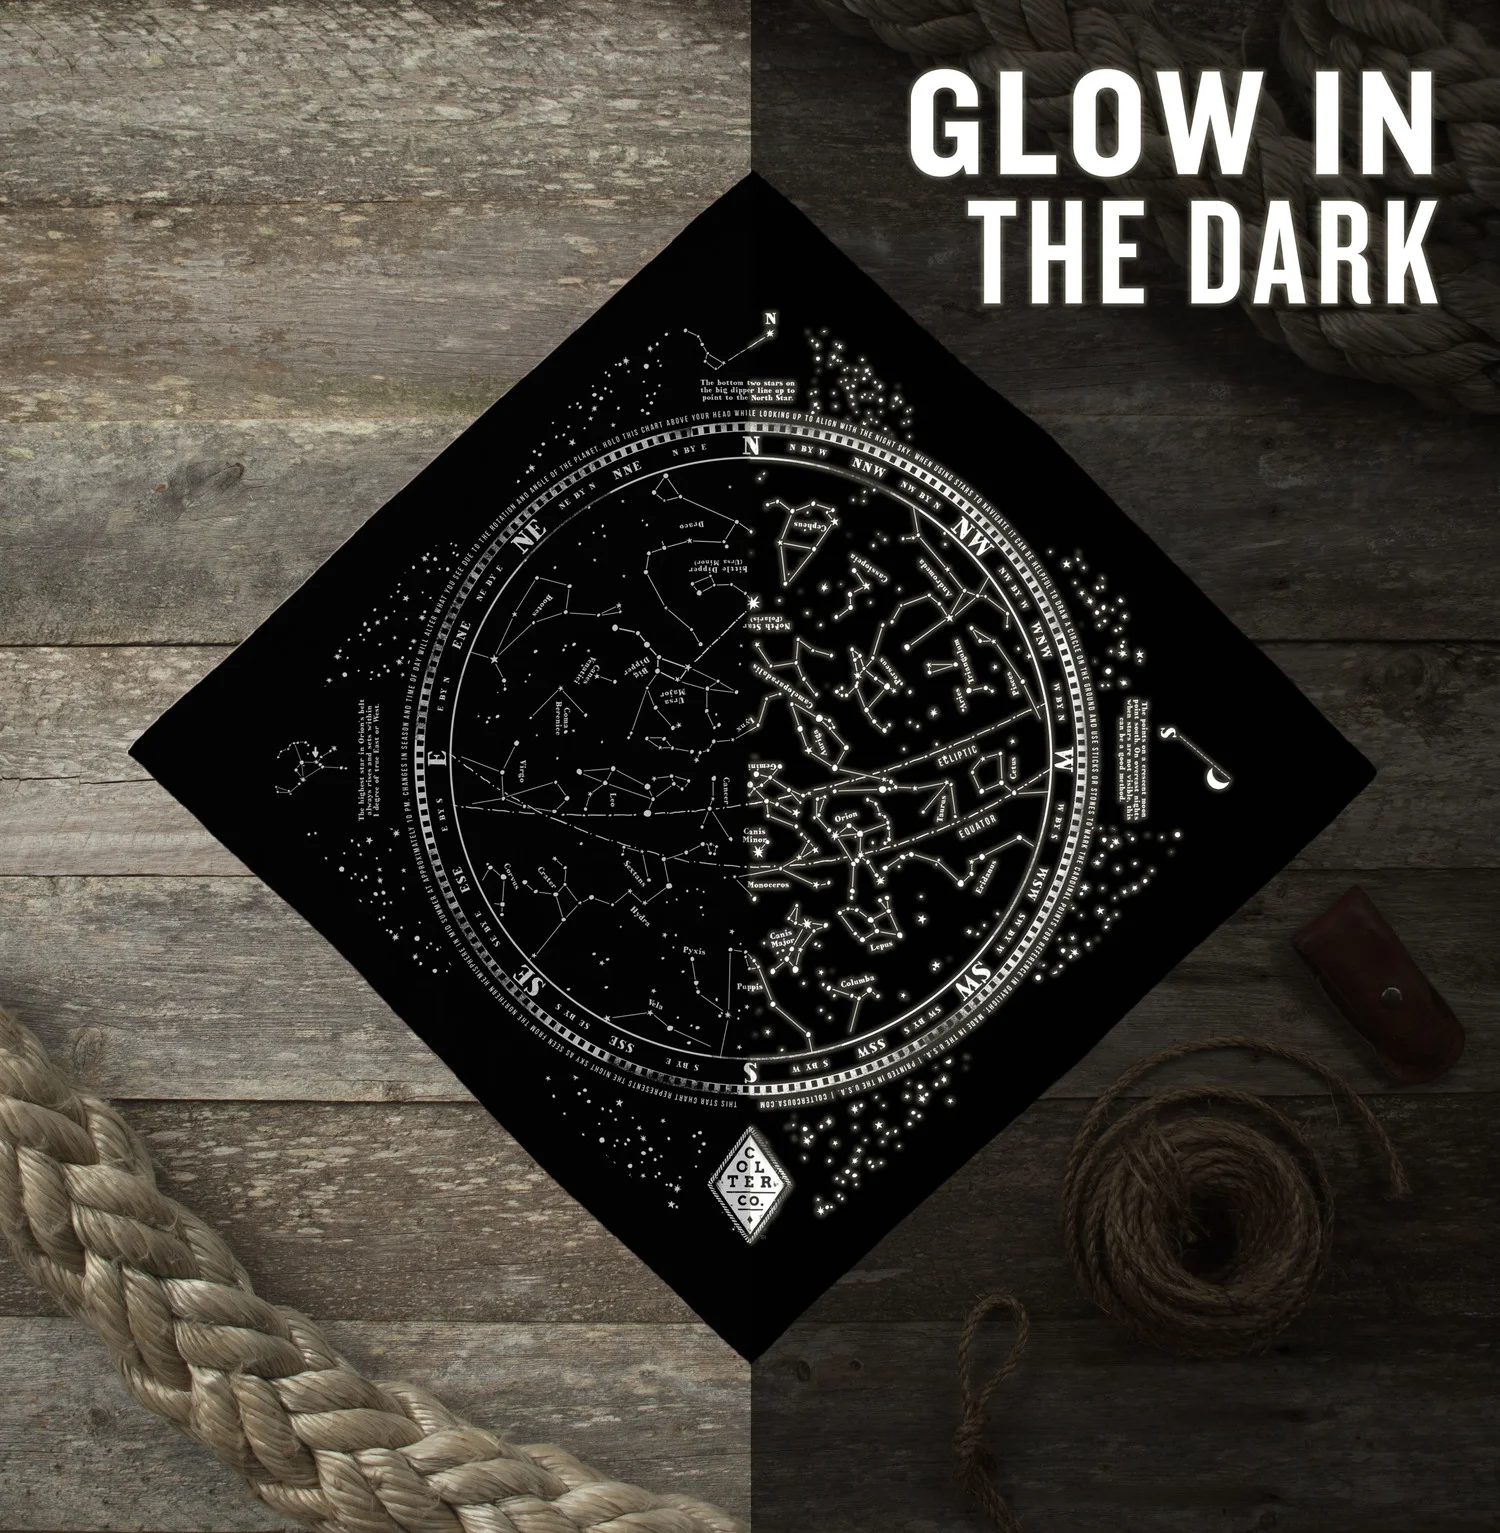
When I designed the stargazer bandana, it was to help provide a few basic navigation tips in a format that wouldn't be a burden to carry. I'm guessing you take a bandana on every hike. Why not make it a navigation asset as well. We made it glow in the dark not just because it's cool (which it is...) but as a functional aspect. The soft glow of the ink allows your eyes to stay adjusted to the night sky while you are looking for constellations. The following instructions come directly from our stargazer bandana and will help you make the most of your bandana in the field.
TIP 1: Finding the North Star
The North Star (Polaris) is the only star in the Northern Hemisphere that doesn't appear to move during the course of the night. All the other starts change their location in the sky and so using them to navigate can be tricky. Finding the North Star is a foundational celestial navigation tool.
The most common way to find the North Star is to trace an imaginary line from the two bottom stars on the Big Dipper constellation. The Big Dipper does move around the sky, but the stars in that constellation are fairly bright and are usually pretty easy to pick out. The North Star is also the last star in the handle of the little dipper.
In the event of it being partially obscured by clouds or trees, or if you are having a hard time finding it, you can also remember that the North Star sits in between the Big Dipper and Cassiopeia (the big W in the sky):
TIP 2: Finding East West
East and West can be determined in a few ways, including marking shadows over time. Place a stick in the ground and mark where the top of the stick leaves its shadow on the ground with a stone. Wait a half and hour or so and mark the new position of the stick. If you draw a line connecting those stones it will point East/West, the second rock being farther east. You can also determine North and South with a perpendicular line. For obvious reasons this method can be hard to do when it's cloudy.
Depending on where you are on the planet just watching the path of the sun can be a bit misleading in terms of finding East and West. Living pretty far north in Washington State, the sun rises and sets pretty far south in the winter. And it never really gets near the center of the sky.
At night a good way to determine East and West is to watch the Orion constellation. The top star in Orion's belt always rises and sets within 1 degree of East and West. Where ever you are on the globe and all seasons. Pretty cool, huh?
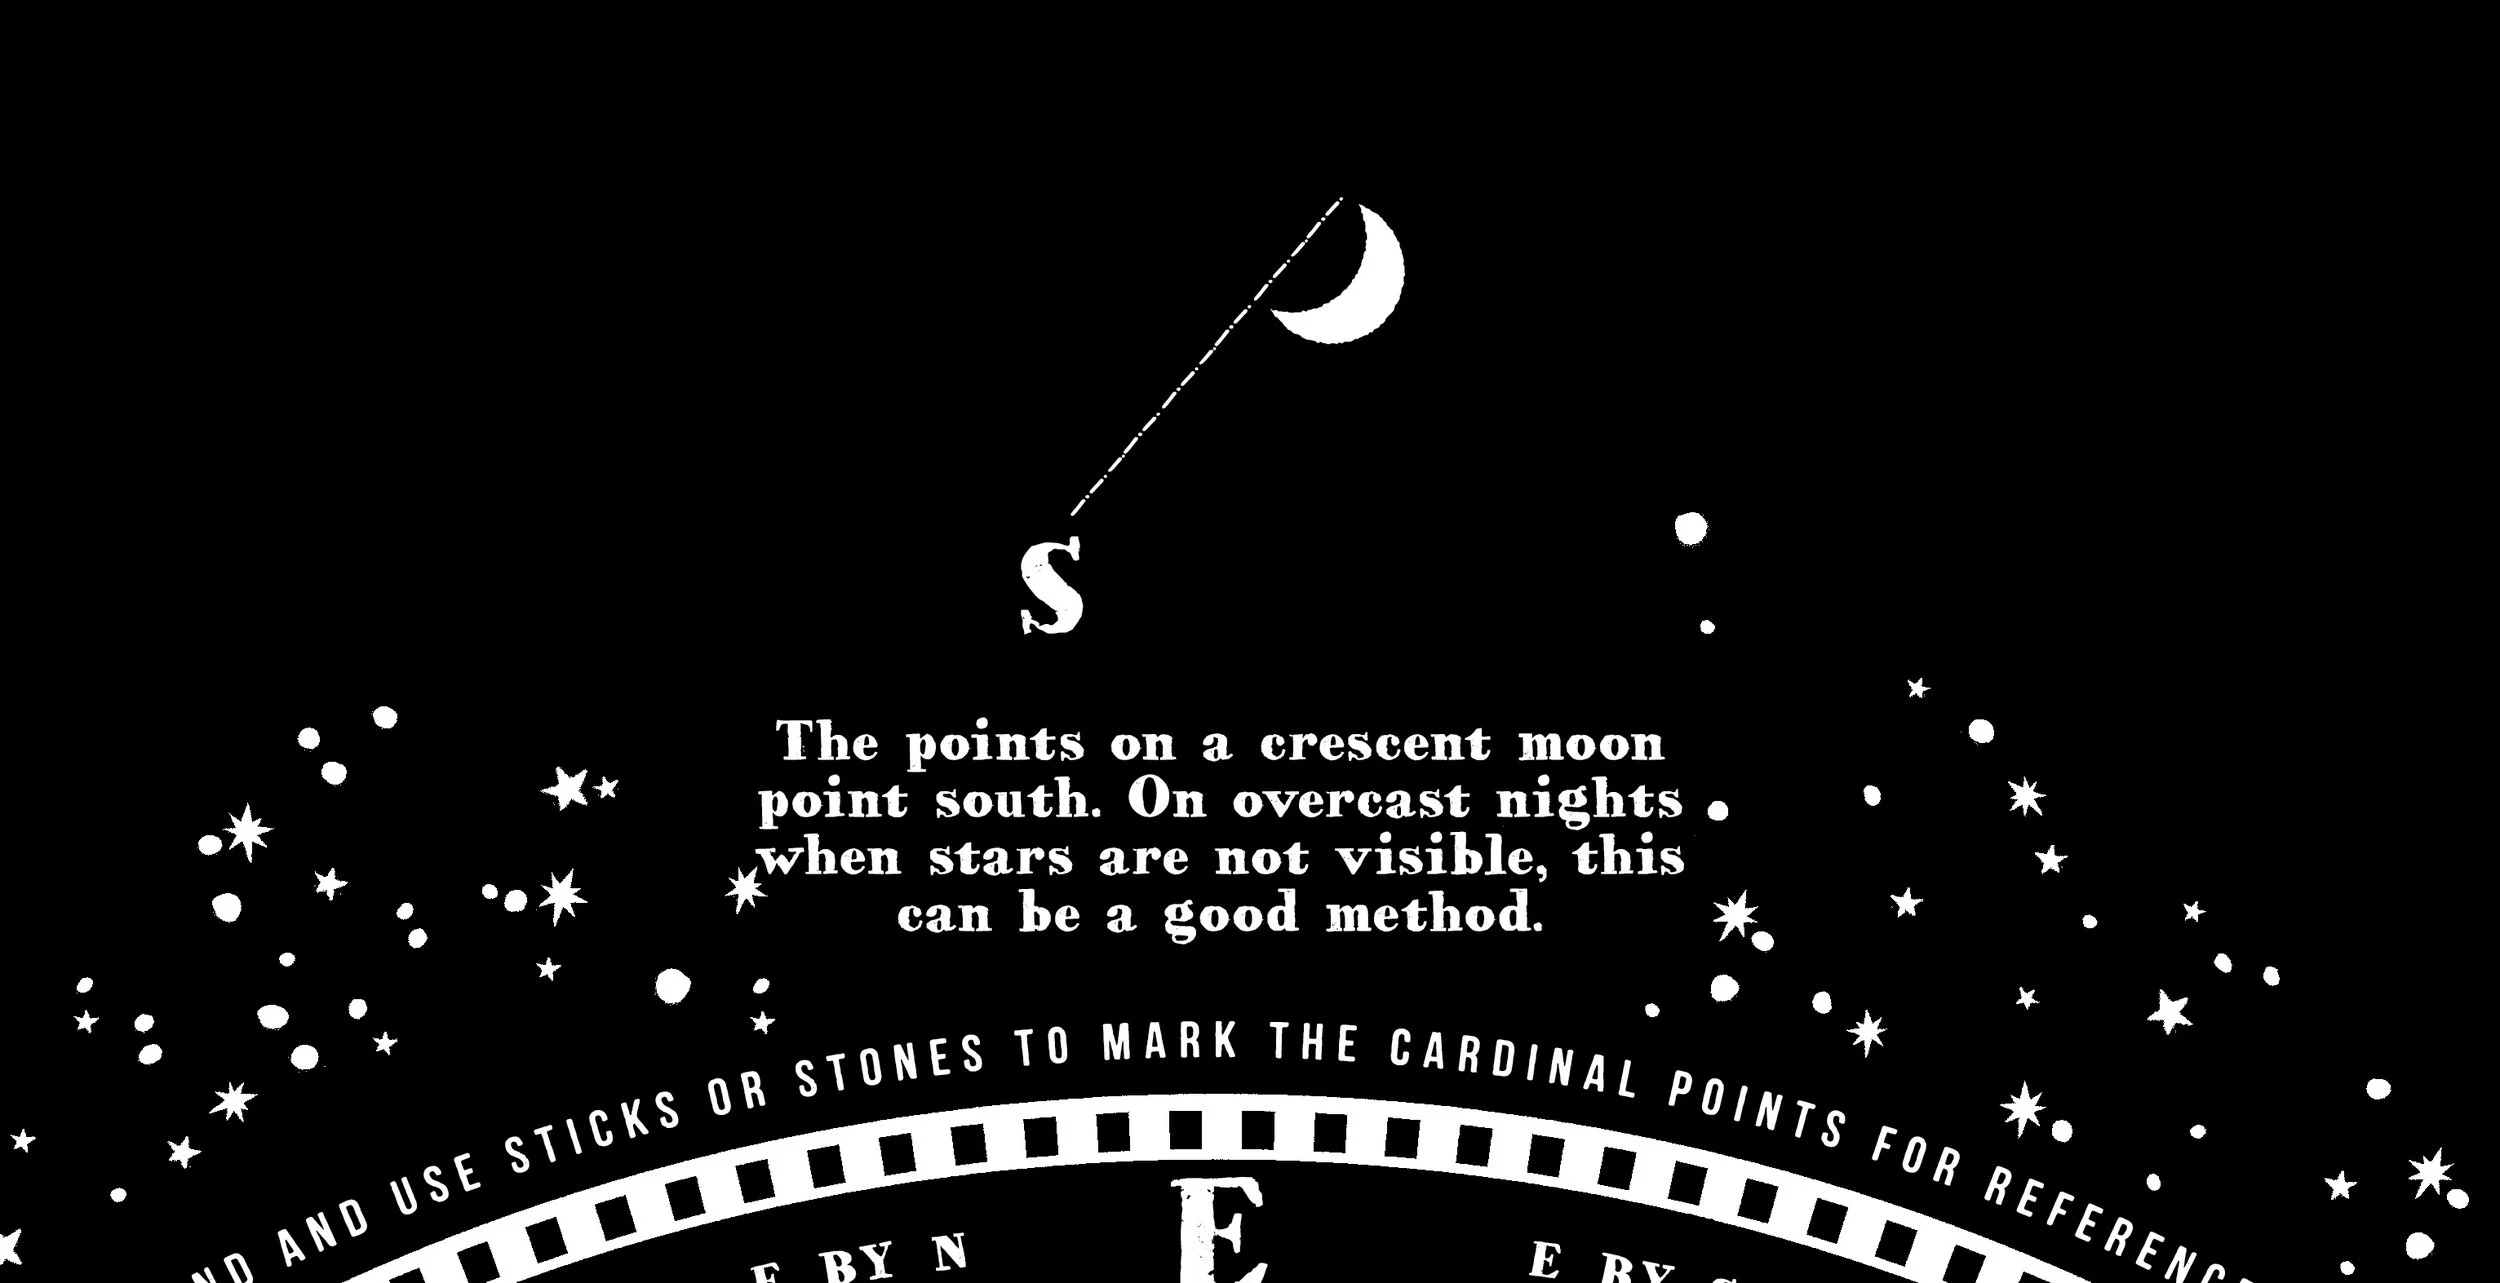
TIP 3: Finding South
In addition to the stick shadow method of finding South, you can use the moon. The points on a crescent moon line up to point South. This one is more approximate, but it's a great thing to use on nights when the North Star and other constellations are covered with clouds, but you can still make out the shape of the moon.
All of these methods should be practices when you get a chance. Any time I get a clear view of the sky I always try to find the cardinal points. Like all things, they get easier with practice. If you'd like a convenient way to remember this tips or to pass these skills on to the next generation our Stargazer bandana is the way to go. Get yours here.
I love fishing in the Pacific Northwest. Even when the catching isn't great, the fishing is amazing. Such a beautiful place, it's hard not to enjoy being out there.
The song for this video is by a very talented young artist called Sammy Brue. Check him out. He's a good kid.
A standard 22" bandana is a powerhouse piece of gear. It's an item that's long history goes back beyond the taming of the West and has been an outdoorsman's staple since then. And for good reason. A bandana can serve so many different uses that it essentially replaces a dozen other pieces of gear. If you traveling by foot, the idea of dropping a dozen items from your pack list can be pretty appealing.
There can be much more exhaustive lists made of what a bandana can be used for, but today I'm going to focus on 25. Some more in depth than others.
25 BANDANA USES:
1. Headband (Sweat Protection) 2. Head Wrap (Sun Protection/warmth) 3. Neck Wrap (Sun Protection/warmth) 4. Wash Cloth 5. Towel 6. Pot Holder 7. Hand Wrap (To Prevent Blisters With Repetitive Work) 8. Gloves 9. First Aid Splint 10. Tourniquet 11. Wrap Sprained Ankle/wrist 12. Ice Pack 13. Fire Building Tinder 14. Strain Sediment From Water 15. Dust Mask 16. Signal Flag 17. Improvised Bag 18. Rope 19. Sponge 20. Blind Fold 21. Dog Collar 22. Fly Swatter 23. Sling 24. Check Wind Direction 25. Hobo Bindle
I'll go a bit more in depth into some of my favorite bandana uses here.
2. THE HEAD WRAP
I'm sure I'm the only one here that seems to be letting a little bit more light in on the top on the head these days. It can really be a bad thing on sunny days when I forget a hat. Luckily for me, I always carry a bandana and can tie one on, pirate style, in a pinch.
3. THE NECK WRAP
I have on occasion (more often than not...) found myself outside with out sun screen. One of the first places I get toasted in the neck. My neck has been saved many times by a bandana and a quick square knot.
6. THE POT HOLDER
A pot holder is one of those things you don't think about until you really need it. It's also something I would never add to my backpacking list... Not when a bandana will do nicely. Of course, the cast iron skillet in this photo isn't on my backpacking list either.
14. STRAIN SEDIMENT FROM WATER
In a pinch, you can strain the sediment from water using a filter made from bandanas, sand, gravel, grass and charcoal. I did it once here.
16. SIGNAL FLAG
Waving a high contrast flag around is a great way to get attention. In nature red is usually going to be a good contrasting color. Unless you're in New England in the fall, I suppose. I've also see people use bandanas to mark a fork in a trail for a later group to follow. Or to create a landmark in unfamiliar territory.
17. IMPROVISED BAG
This is a favorite of mine. By simply tying together diagonal corners with square knots you get a handy little pouch for carrying smaller items, like berries. It's kind of like a loose hobo bindle.
20. BLIND FOLD
I'm not just talking about pin the tail on the donkey here. You can use a bandana to block out unwanted sunlight to grab a quick nap during the day.
Hopefully this will get the gears turning on new uses for your bandana. Maybe it will empower you to be able to leave a few more items home on your next backpacking trip. I know I'm always looking to lighten to load.
Here at Colter Co., we are on a mission to improve the humble bandana. We add another layer of benefit to every bandana to make them even more useful in the outdoors. Whether it's knot diagrams, star charts, or board games, we are making bandanas better. Pack less, take more.
Last week was our big backpacking trip for the year. 4 days and 3 nights with my two boys and a couple friends and their boys to a couple different lakes in the Alpine Lakes Wilderness. It's an area north of Snoqualmie pass. I've hiked several different trails in the area and it never fails to amaze me.
We started out on Wednesday evening and hiked the 3.25 miles to Snow lake. Wednesday, it turns out, is a good day to go to Snow lake. More on that later. Snow lake is a good sized lake with a fair amount of good camping spots around the south east side of the lake. There are at least a couple pit toilets around that make things a bit easier as the ground isn't super easy to dig. The lake basin is filled with huckleberries and they were perfectly ripe last week. The water is clear and the deep blue of snow run off. Great for swimming... After some acclimation.
We camped there that night, awoke to make pancakes for breakfast, broke camp and headed to Gem lake. The trail winds around Snow lake, giving you a spectacular view of the lake from all angles. 1.7 miles later you get to Gem lake. As soon as you get a peek at Gem lake, you know how it got its name. It looks like a sapphire set in the rough mountains around it. Beautiful, clear and blue. But don't stop there. The view from the east side of the lake is so much better. It would be a shame to get to the lake and not get the view from the east side.
We swam in the lake, replenished water and did a little laundry that afternoon. The next morning my oldest son and I made the .33 mile trek to the top of Wright Mountain. The trail is about 1/3 scramble over rocks lead by cairns. The trek is steep, but well worth the trip! You can see for miles in every direction. Mostly it's more rocky peaks and glacier carved valleys as far as the eye can see. You can see Gem lake, Snow lake, upper and lower Wildcat lakes and couple other smaller lakes.
In an effort to make the last days trek out not as hard, we broke camp that morning and headed back to Snow lake. We had originally wanted to stay at Gem lake 2 nights. Actually I wouldn't have minded staying at Gem lake for two weeks... But the idea of a 5 mile hike out the next day with the smaller members of the group already pretty exhausted didn't seem like a good idea. So we headed back to Snow lake, enjoyed another swim there and stayed the night.
There are good stretches of the trail that are pretty rough. Liam made the trip with a broken arm. What a tough dude... He didn't complain about anything, but he did slow down quite a bit when he got tired. Another member of the group and I would occasionally take his pack so he could pick up the pace.
Snow lake is amazing, well worth the trip. But I would HIGHLY recommend going during the week. Friday night there was at least one pretty loud group staying the night. Up laughing and yelling until at least 4:30 am. Not cool, guys. The next day, Saturday, we counted over 500 people on the trail going up to the lake as we hiked out. Pretty crowded... Very different from our experience on Wednesday.
In our down time at camp we enjoyed a few rounds of checkers on the Cabin Fever bandana. Rocks vs. Pine cones. This bandana always comes in handy, especially on a trip where you know you'll have time at camp and don't want to carry any extra weight.
Over all the trip was amazing. Enjoyed by kids and adults alike. Washington never ceased to amaze me. Driving through Snoqualmie pass, I would never had guessed such amazing views were just a few miles off the main road. Such a blessing to live in a place like this.
Have you backpacked in this area? What are your favorite trails to hike?