instructional article

Recipes, instructional article

DIY Backpacking Blueberry Granola

Colter Co backpacking blueberry granola

I recently bought some freeze dried granola for a backpacking trip. Everybody loved it! Way more than I expected. As a parent of kids that are sporadically picky eaters it makes picking backpacking food a sensitive subject. I was happy to find something they liked. The bonus is that it’s super easy to prepare. Just add a half cup of cold water. On mornings you need to get up and moving fast it’s a great solution.

The downside is that they are $6 a piece. To be fair, that’s cheaper than most freeze dried meals, but still. I decided to see what it would cost to do it myself. The most expensive ingredient was the freeze dried blueberries. I decided to use freeze dried because the shelf life is very long, but if you were going to make a batch of these to be used with in a few days you could use dehydrated or dried fruit (like raisins) which would be a lot cheaper. I added 1/3 cup of powdered milk and a scoop of tasteless protein powder for a little extra kick.

Each of these servings cost about $2.25 to make. Will it have a 25 year shelf life? No, it will not. But it will be fine for several weeks, or longer even. I don’t work fo the FDA, so I can’t really say for sure :)

I did take the extra step of putting it into a FoodSaver bag and vacuum sealing it with an oxygen absorber packet to be safe. I am planning a trip in a couple weeks so that was probably overkill.

I gave one of these to my son and he liked it just as much as the $6 version. Win!

DIY backpacking blueberry granola colter co

Here’s the full recipe. Feel free to pin this, or share it! Let me know how it goes for you.

blueberry granola-02.jpg

instructional article

DIY survival fishing kits for kids

Colter co. survival fishing kit

This summer I am taking a small group of 12-14 year old scouts (including my son) on a 4 day camping trip. It’s going to be awesome! We are going to be focusing on building shelters, and basic survival skills like fishing. In preparing for this I helped put together some ultra simple fishing kits. I wanted to make these are simple as possible for them to use safely. They would be a little over simplified for an advanced angler but for the sake of young anglers I have made these super simple. They only require one knot to be tied and don’t require any tools to add or remove weights.

Here’s what I included:

survival fishing kit Colter Co.

3 - Red #8 hooks with leaders

1 - #8 spinner with leader

2 - 5/8” bobbers

5 - Swivels

5 - Small bullet sinkers

3 - Small dipsey sinkers

1 - PowerBait nuggets (not pictured)

The weights are all the kind that slide over the line which means you don’t need to use your teeth or a multitool to add or remove them. They also allows you to fish easily from a bobber or off the bottom with floating bait. I find the sliding sinkers preferable for fishing off the bottom. Be mindful that this options should be used only when you know what the bottom of the water is like. If there are lots of snags and down trees a bobber is going to be a better approach.

I chose to include the PowerBait nuggets because they are super easy to put on. I’ve tried to eliminate any possible way for these guys to get their fingers hooks. Putting bait on a hook is prime hooking territory. The nuggets are pre-formed in a good size and are very easy to slip onto the hook. I made sure to get floating bait to be able to fish off the bottom.

survival fishing powerbait nuggets Colter Co.

I decided to use the hooks that are pre-tied to the leader. I don’t usually use these because they take up more space in the tackle box. But I was thinking about these 12 year old trying to tie a a line onto these tiny hooks and imaging all the hooks in finger and I didn’t want to mess with that. These pre-tied hooks just need to be attached to a swivel. The only knot you need is to tie the line to the swivel. I picked the red colored hooks so, in a pinch, you could tie a bit of colorful paracord or something on and make it a lure.

survival fishing kits Colter Co.

I’m going to try a replacement to the tradition rod and reel this year. I got a hand reel, or Cuban reel. It’s basically a plastic line holder that has one lip formed at an angle that allows the line to come off easily. While holding the “reel” facing forward, throw your weighted line out and the line comes off the reel just like a spinning reel. The line is then wound around the reel by hand. It’s very small, light weight, and doesn’t have any of the breaking issues that can happen with the delicate fiber glass rod or small moving parts. Can you cast as far with this set up? Probably not. But I think the pros should out weigh the cons. I’m going to try it this year and I will report back on how it goes!

I did make one improvement to this product by cutting a small slit in the rim with my pocket knife. It gives me a place to hold the line securely when in transit.

Survival fishing kit Colter Co.

In training for this outing I taught the boys how to tie a clinch knot. For this particular fishing set up, that’s the only knot you would really need. If fishing knots are your thing, or if you are looking to do fly fishing (which uses waaaay more knots), we make a handy fly fishing knot reference bandana that will help you refresh your memory on some of the knots that are farther back on the line and tied less frequently.

I am also going to be providing a “Stayin’ Alive Bandana” to each of the boys with reference information on the 4 top priorities for survival: shelter, water, fire, food. If you are teaching youth about survival, this is a solid way to make sure they have a lot of information in a format they can use for lots of other things and are more likely to take with them. Also it doubles as a bright location marker with reflective silver ink for high visibility at night.

Tell us about the amazing outdoor activities you have planned this summer! Are you teaching kids survival skills? What skills are you focusing on?

-John

instructional article

Do you know the 4 fundamentals of Survival?

Knowing how to keep yourself alive is a fundamental human skill! In our increasingly convenient modern world some of these fundamentals can seem less important. When we can easily turn on the faucet and get water whenever we want it’s not hard to forget that one day you might be in a situation that doesn’t provide you with such a luxury.

In a moment your focus can shift from “ugh, my phone battery is at 7%” to “what do I need to stay alive through the night.” It’s best to have a store of age old human knowledge for just such an occasion.

The fundamentals of human survival can be simplified into 4 priorities:

Shelter
Water
Fire
Food

In that specific order. If you spend your time working on finding food before you have a shelter established you might just end up freezing to death with a full belly. Make sure you approach them in the right order!

When I started Colter Co. it was for the purpose of providing outdoor information in a format that was in itself multifunctional (enter the bandana…) I don’t really like packing books on camping trips, especially when weight and space is an issue. I’m super happy to add a TRUE wilderness survival bandana to our collection!

Yes, there are other survival bandanas on the market, so what makes this one better? It focuses not just on helpful outdoor skills, but on the PRIORITIES for your efforts. One of the biggest challenges of being in a survival situation is not panicking! Many other survival bandanas are a shotgun blast of facts and tactics that don’t help an already frantic mind know WHEN to take on your next task.

It’s also printed with high visibility reflective ink on a bright hunter orange bandana. Being visible is key to being found. When you build a shelter out of natural materials it can become very easy to blend in. The worst case scenario would be having a rescue team walk right past you while you sleep in your shelter. This bandana makes an awesome shelter marker and with the reflective ink it will light up super bright when hit by the beam of a flashlight.

As always, our bandanas are printed on American made cotton for superior durability and softness.

This is a great way to add a higher lever of preparedness to your survival kit! It also makes a great gift of knowledge and preparedness to a young adventurer.

If you can’t decide on which of our designs you love the most you can always make it a part of a 3 pack or a 6 pack :)

instructional article

Smoked Beef Jerky Recipe

smoked_jerky_colter_co

I got a smoker last year. It's something that I've been interested in for a while. Not just because it make amazingly mouthwateringly delicious food. It's the tradition of food preservation that I found compelling. Smoking foods to preserve them has been used for a very long time and I wanted to add it to my list of traditional skills.

I got in my head that I wanted to try making smoked beef jerky. Regularly beef jerky isn't my go to snack. I generally find it to be too sweet, or too soy saucey, or something. But I do like the idea of preserving meat that way, and I figured if I had more control over the recipe it might turn out more to my liking. 

I read a ton of recipes. There are no shortage of jerky recipes out there. 99% of them start with a ton of soy sauce. This has never made any sense to me. I know Lewis and Clark subsisted on a lot of dried meats, and I KNOW they weren't lugging around barrels of soy sauce. It just doesn't seem very traditional to me. So I made my own recipe with apple cider vinegar instead of soy sauce. 

Before I get to the recipe, let's talk about the smoker. I'm using a Weber charcoal smoker. I call it the R2-D2 model. Not sure what it's really called. I modded my by added 4 screws near the top which allows you to put the meat rack up higher. It worked great for hanging jerky.

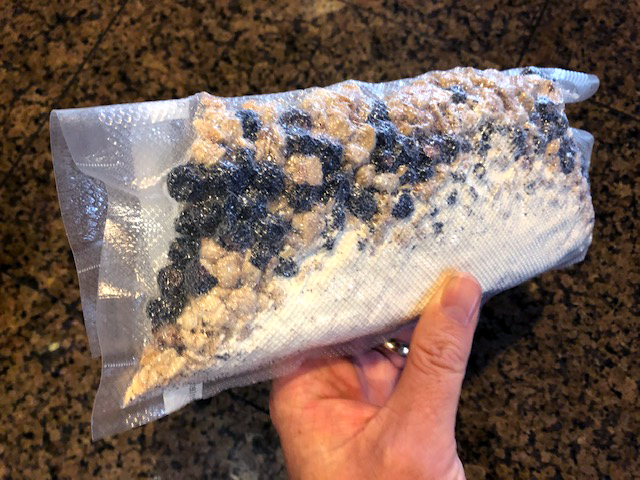
I've used electric smokers and prefer the charcoal. I made a ring of unburned charcoal in the shape of a "C" in the bottom of the smoker and added about 12 live coals to one end. It ends up acting like a charcoal fuse and burned plenty long for this. I put apple wood chunks along the top of the coals and they smoldered and produced nice smoke as the "fuse" burned. It stayed right about 180 degrees the whole time. I ended up smoking the jerky for 3.5 hours and it ended up more smokey than it needed to be. Next time I'll give it a good smoke for an hour and then let it dry out at 180 degrees for another two hours. 

Prepping the beef! There are plenty of different cuts that will work. Look for something lean. You're going to want to cut off as much of the fat as you can. Don't worry too much about marbling in the meat. It will render out on the smoker. Partially freezing the beef before hand helps make the slicing process easier. Slice it 1/4 thick. You can slice with the grain for a more firm jerky or across the grain for a jerky that pulls apart more easily.

The Recipe:

- 2 lbs. of lean beef
- 1/2 cup Apple Cider Vinegar
- 1 Tbs Worcestershire sauce
- 1 tsp ground black pepper
- 1 tsp Kosher salt
- 1 tsp ground coriander
- 5 cloves of garlic (diced as small as you can)
- 1 tsp Molasses
- 1/2 tsp Cayenne pepper

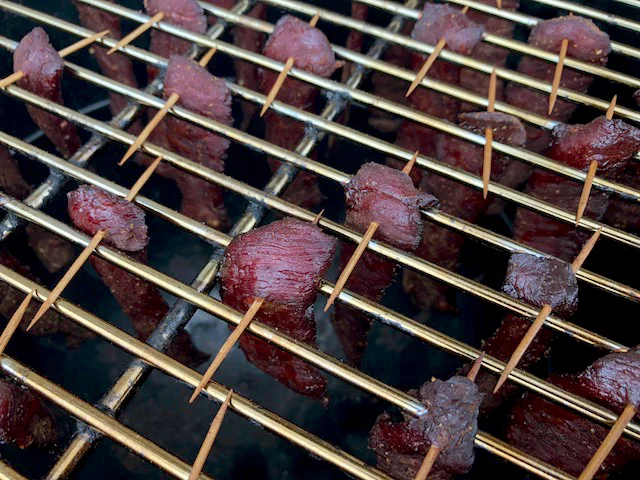
Mix all these together, and marinate the sliced beef for at least a few hours (I did overnight.) After it's good and marinated pull the strips of beef out and dry them off with a paper towel. Run a tooth pick through one end of each strip. This allows you to hang them vertically in the smoker and saves a lot of space. I add a bit more fresh ground pepper at this stage and then on to the smoker they go! Make sure the temperature stays around 180 degrees. Keep and eye on it to make sure the temperature is right and it's still producing good smoke. 

smoked_jerky_colter_co

When they're done take them off, remove the tooth picks and dab off the rendered fat with a paper towel. Enjoy it fresh of vacuum seal and store in the freeze for long term storage. I bet it won't last long enough to need to store it though :) 

As I said, this was the first time I tried this, but will NOT be the last! My 8 year old son (who helped me) refers to it as "Beef Bacon." That a pretty accurate description! It was a huge hit with the family. Give it a try and let me know how it goes!